Blogger is being a little butt while I try to write and upload a post about painting a picture step by step... so we'll save that for another time.
I can't believe its been nearly a month since my last post! But I promise that I have been really busy since then with work events, football games,and holiday stuff. Fortunately, I did take advantage of some spare time I've had after work and on the weekends to paint and do some crafts.
One thing I tried and loved was making coasters. I did a trial run with some old scrap book paper and really liked how it turned out. So, soon after, I made these for a friend's birthday:

They turned out so well, that I decided to make some for our house! Here is how I did it, step by step:
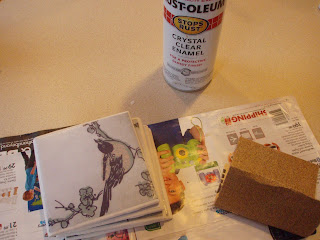
1. Your supplies:


I can't believe its been nearly a month since my last post! But I promise that I have been really busy since then with work events, football games,and holiday stuff. Fortunately, I did take advantage of some spare time I've had after work and on the weekends to paint and do some crafts.
One thing I tried and loved was making coasters. I did a trial run with some old scrap book paper and really liked how it turned out. So, soon after, I made these for a friend's birthday:

They turned out so well, that I decided to make some for our house! Here is how I did it, step by step:
1. Your supplies:
- Paper: I used scrapbook paper that I really liked at Michaels.
- Tile: shower tile is the perfect size. My parents were kind enough to give me some of their extras from when they installed a shower a few years ago.
- Modpodge... yep!
- Sponge brush
- Felt: I used the little felt buttons that have a sitcky side.
- Hot glue gun: used to reinforce the felt buttons.
- Sand paper: just to make sure everything is smooth before you put on the sealer.
- A gloss sealer.
2. Modpodge the paper on to the clean tile after cutting it to the proper size.

 |
| First apply a coat of modpodge to the tile. |
 |
| Give the paper some time to dry until it is stable and won't move around when you modpodge on top of the tile and paper. |

 |
| Apply 4 to 5 coats, allowing it to dry for about 15 minutes in between applications. |
3. After I applied those 4 to 5 coats (quite liberally) I allowed it plenty of time to dry over night. Then, I sanded the edges, making sure they were nice and smooth before wiping them down with a damp cloth.

 |
| Rough edges are inevitable. Just use sand paper to smooth them out. |
4. Once they are smooth and dry, move the tiles on a cardboard surface outside or in a well ventilated room/area. I applied 3 coats of enamel to my tiles, allowing them to dry for about 30 minutes in between coats.


Here is the brand the nice lady at Lowes recommended... It can be used on essentially any surface.
5. Putting on the feet: Once the enamal has dried completely (about an hour), bring it back inside and plug in the hot glue gun!


And that's pretty much it! The only thing left to do is sit back, enjoy a brew and enjoy not damaging your furniture!

No comments:
Post a Comment