Showing posts with label Arts and Crafts. Show all posts

Sunday, January 27, 2013

Cork Project!

Long story short (skipping the part where they add up....) I always feel like I should save my corks for... something. But what? Finally, I saw how someone online had glued them to a yard stick and used them as a narrow recipe and picture "cork board" near their stove. I didn't want to use a yard stick as it seems too long for that but found the wood section at Michael's to be better than I thought it would be! 

So here is what I did:

I used a piece of wood that measures about 1/4 inch thick and maybe 1 inch wide and two feet long. I think it was initially intended as a yard ornament holder... thingy. 

I gathered other things I would need - black paint, a sponge brush, the corks, and hot glue gun. 


First, I sat out to paint it black with just acrylic craft paint. Nothing special - just the cheap stuff. I let it dry for the night.


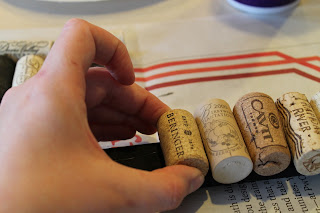
Then I used a hot glue gun to glue them down, one by one. 


Once they were all glued down, I gave them a few minutes to dry before testing a few to make sure they wouldn't fall off. They all passed my toughness test. 


Then, it was ready to hang! I thought about using it for recipes but then decided that I had a wall that could use some help instead. 

Sunday, January 6, 2013

Painting Poppies #3: Poppies at Sunset


Here are some of the colors I used for the painting. I also used the Da Vinci alkyd gel medium for the oil paint.

This is a 10 x 14 canvas.

I knifed on titanium white mixed with alizerin crimson and titanium white and ultramarine blue.

Van dyke brown

I knifed sap green over the van dyke brown.

I used a palette knife to pull the sap green/van dyke brown combination up and give the illusion of grass.

I then added in emerald green to lighten it up and add more dimension.

On some of the higher stems, I added some lighter red buds for distance. Then on the "close"/higher stems I packed on the paint to make the flowers and used a van dyke brown/sap green mixture for the centers. 

Poppies

The holiday season is time consuming. I made some coasters as Christmas gifts and was literally putting the finish on them at the 11th hour. 

However, last weekend I finally found some time to experiment with some new palette knife painting and discovered that I love painting poppies. I painted three pictures and I can't wait until they dry and I can hang them!


Poppies #1: My first attempt.


 Poppies #2: Poppy field in the rain. 

Poppies #3: Poppy field at sunset.

I painted the first two on December 30 and the third on January first. It was a great way to start 2013!

Sunday, December 9, 2012

In the Holiday Spirit

The tree is up, the decorations are set and I had one table with just a little too much room. Naturally, the solution for that must involve Pinterest and my abundant collection of empty wine bottles. I had seen a picture of a beautiful centerpiece and decided to investigate further. It was a little messier than what I thought it would be but it turned out great!

I used:
Ivory Indoor/Outdoor paint
Three wine bottles
spray adhesive (next time, I'll use Modpodge.... the spray adhesive turned out to be quite messy and one time use)
Epsom salt
A pretty tray

First, I made sure the wine bottles were clean. I tried taking the labels off using a kitchen knife to scrape but I quickly abandoned that idea when I nearly sliced off the tip of my middle finger. That is an important finger, afterall.

Then, since it has been unseasonably warm, I was able to spray paint the bottles outside with the indoor/outdoor paint. I made sure that the can specified the paint was safe to use on glass without a primer. I think I applied 3 or 4 coats, making sure that the paint dried in between applications. Also, it doesn't have to cover perfectly and smoothly. I used a paint with a satin finish and I, even though there were some thine and rough patches, it turns out fine in the end. I then allowed it to dry for another 24 hours.

Next, I laid news paper all over my work space and grabbed a large paper plate from our tailgating supplies. I poured a good amount of epsom salt into the plate. I grabbed my dried wine bottles and sprayed one down with adhesive... very messy business and I'm glad I had plenty of news paper. I then rolled the wine bottle in the salt. 

It makes for a very frosty look... I finished by placing the bottles in a silver tray, adding a tall, Christmas scented candle and putting little holiday sprigs in them ($0.50 at Michaels). I also used more epsom salt in the bottom of the tray. It turned out great!


Tuesday, December 4, 2012

December Already?

Blogger is being a little butt while I try to write and upload a post about painting a picture step by step... so we'll save that for another time. 

I can't believe its been nearly a month since my last post! But I promise that I have been really busy since then with work events, football games,and holiday stuff. Fortunately, I did take advantage of some spare time I've had after work and on the weekends to paint and do some crafts.

One thing I tried and loved was making coasters. I did a trial run with some old scrap book paper and really liked how it turned out. So, soon after, I made these for a friend's birthday:


They turned out so well, that I decided to make some for our house! Here is how I did it, step by step:

1. Your supplies:

  • Paper: I used scrapbook paper that I really liked at Michaels.
  • Tile: shower tile is the perfect size. My parents were kind enough to give me some of their extras from when they installed a shower a few years ago. 
  • Modpodge... yep!
  • Sponge brush
  • Felt: I used the little felt buttons that have a sitcky side.
  • Hot glue gun: used to reinforce the felt buttons.
  • Sand paper: just to make sure everything is smooth before you put on the sealer.
  • A gloss sealer. 
2. Modpodge the paper on to the clean tile after cutting it to the proper size. 


First apply a coat of modpodge to the tile.

Give the paper some time to dry until it is stable and won't move around when you modpodge on top of the tile and paper. 


Apply 4 to 5 coats, allowing it to dry for about 15 minutes in between applications. 
3. After I applied those 4 to 5 coats (quite liberally) I allowed it plenty of time to dry over night. Then, I sanded the edges, making sure they were nice and smooth before wiping them down with a damp cloth.


Rough edges are inevitable. Just use sand paper to smooth them out. 


4. Once they are smooth and dry, move the tiles on a cardboard surface outside or in a well ventilated room/area. I applied 3 coats of enamel to my tiles, allowing them to dry for about 30 minutes in between coats. 


Here is the brand the nice lady at Lowes recommended... It can be used on essentially any surface. 

5. Putting on the feet: Once the enamal has dried completely (about an hour), bring it back inside and plug in the hot glue gun!


And that's pretty much it! The only thing left to do is sit back, enjoy a brew and enjoy not damaging your furniture!


Sunday, October 21, 2012

Yarn + Old Glass Bottles

I really do not like throwing away empty glass bottles. I feel like there should be so many fun things out there that you can do with them. Recently, my collection of wine bottles started getting a little out of control so I started some hard core pinteresting and found something that seemed simple and fun... actually I found several different projects that look fun and I pinned them (http://pinterest.com/sweetlacy/crafty/). 

Here is the project I did using clean empty glass bottles, some cheap yarn and a hot glue gun. 


I used a beer bottle, a wine bottle and a rum bottle, all different sizes.

Just the typical hot glue gun. 

I found that it was easier starting at the top and working my way down.


It doesn't have to be perfect because you can fill in those holes later.

Use extra hot glue at the bottom to make sure the yarn doesn't start to unwind. Then just start going back up the bottle to fill in the gaps.

For this bottle, I added some black. 
Also, wine helps the creative juices flow.

Here are the finished products. Different sizes, different looks. I might accent the solid bottles with the other color of yarn just because I really like how the little bottle looked. Otherwise, I think they look great!