Tuesday, January 29, 2013

Daffodil Delight

A friend approached me a month ago or so and asked me if I would consider painting daffodils. They are her mother's favorite and she was considering giving her mother a daffodil painting for her birthday in May. I'm glad that she gave me plenty of time to perfect them because, honestly, they are a little more challenging than what I expected. However, the challenge certainly makes it more fun and I've really enjoyed what little I've done so far - I feel like I've accomplished a much better understanding already! 

Below are the paintings I've done... the first weren't so great but I'm pretty excited about the last two. I think I'm finally understanding the best way to paint them to make the textures come across. Another thing, I tried knife painting one and failed miserable. The knife paintings of daffodils that I've seen online are very impressionistic to a degree that I'm not terribly comfortable with. I'm becoming more reacquainted with brushes by practicing these daffodils and I must say that it as been a fun experience so far! 

Hopefully, I'll have more delightful daffodils to post soon!

First two sad attempts. The problem came with blending... it is difficult to work with the blue sky background underneath the flowers.

Finally, something that looked like a daffodil!

The blue background wasn't the best idea I ever had but I do like this color and the flowers turned out pretty good again!

Sunday, January 27, 2013

Cork Project!

Long story short (skipping the part where they add up....) I always feel like I should save my corks for... something. But what? Finally, I saw how someone online had glued them to a yard stick and used them as a narrow recipe and picture "cork board" near their stove. I didn't want to use a yard stick as it seems too long for that but found the wood section at Michael's to be better than I thought it would be! 

So here is what I did:

I used a piece of wood that measures about 1/4 inch thick and maybe 1 inch wide and two feet long. I think it was initially intended as a yard ornament holder... thingy. 

I gathered other things I would need - black paint, a sponge brush, the corks, and hot glue gun. 


First, I sat out to paint it black with just acrylic craft paint. Nothing special - just the cheap stuff. I let it dry for the night.


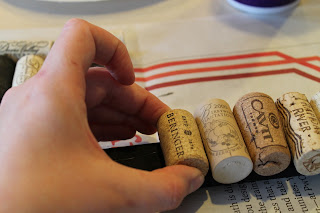
Then I used a hot glue gun to glue them down, one by one. 


Once they were all glued down, I gave them a few minutes to dry before testing a few to make sure they wouldn't fall off. They all passed my toughness test. 


Then, it was ready to hang! I thought about using it for recipes but then decided that I had a wall that could use some help instead. 

Sunday, January 6, 2013

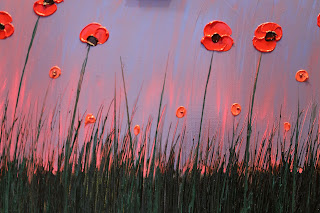
Painting Poppies #3: Poppies at Sunset


Here are some of the colors I used for the painting. I also used the Da Vinci alkyd gel medium for the oil paint.

This is a 10 x 14 canvas.

I knifed on titanium white mixed with alizerin crimson and titanium white and ultramarine blue.

Van dyke brown

I knifed sap green over the van dyke brown.

I used a palette knife to pull the sap green/van dyke brown combination up and give the illusion of grass.

I then added in emerald green to lighten it up and add more dimension.

On some of the higher stems, I added some lighter red buds for distance. Then on the "close"/higher stems I packed on the paint to make the flowers and used a van dyke brown/sap green mixture for the centers. 

Poppies

The holiday season is time consuming. I made some coasters as Christmas gifts and was literally putting the finish on them at the 11th hour. 

However, last weekend I finally found some time to experiment with some new palette knife painting and discovered that I love painting poppies. I painted three pictures and I can't wait until they dry and I can hang them!


Poppies #1: My first attempt.


 Poppies #2: Poppy field in the rain. 

Poppies #3: Poppy field at sunset.

I painted the first two on December 30 and the third on January first. It was a great way to start 2013!